CSS+JS如何制作皮卡丘动画(代码分析)
时间:2021-08-01 来源:互联网
今天PHP爱好者给大家带来本篇文章给大家介绍一下CSS+JavaScript制作皮卡丘动画的方法,会一步步给大家介绍使用css如何绘制皮卡丘,如何使用js实现动态效果,让皮卡丘动起来。希望对大家有所帮助。
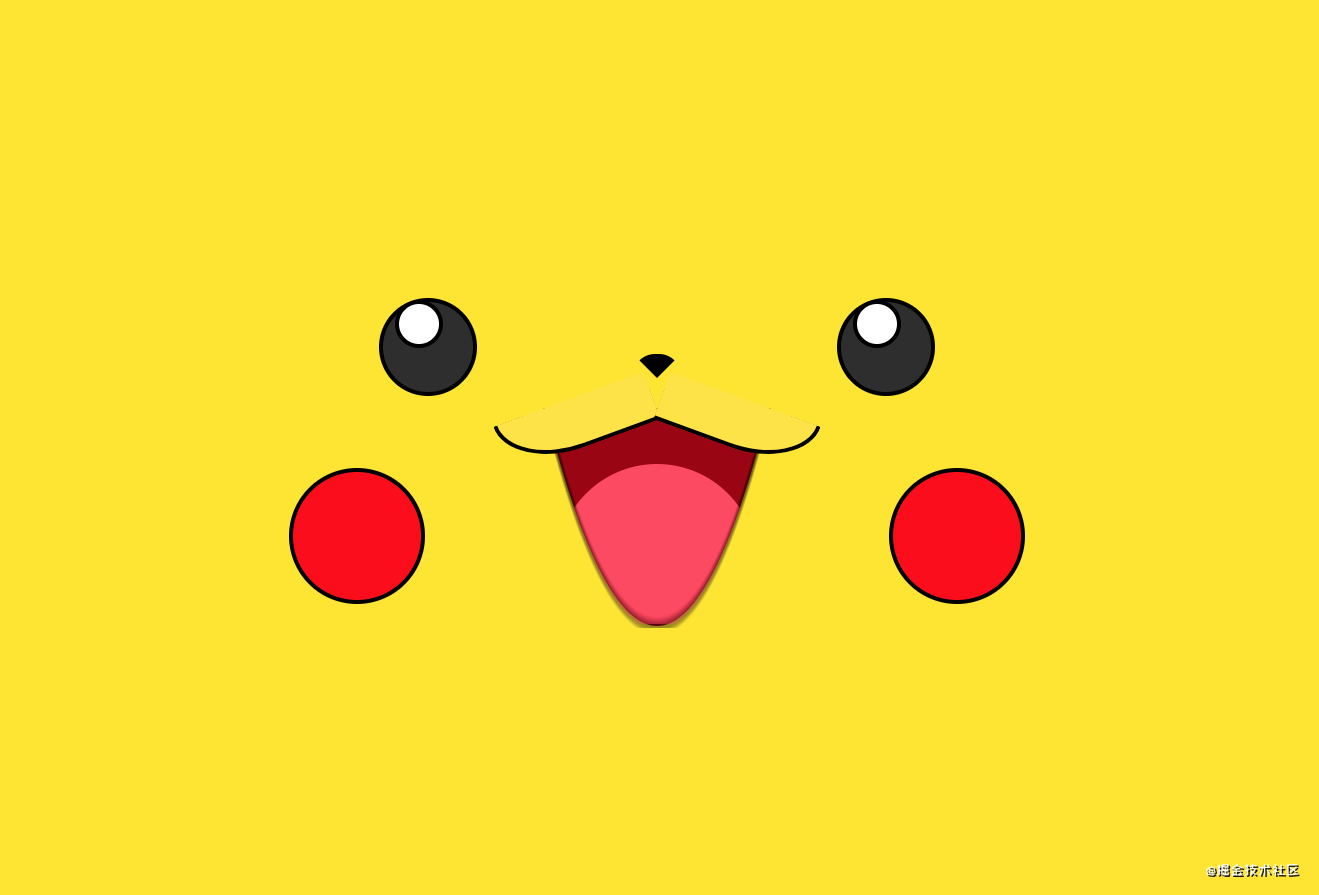
简单记录一下思路,有非常多可以优化的地方
画鼻子(一个扇形)
利用 transparent画出合适的三角形
.nose {
  position: absolute;
  border: 10px solid black;
  border-color: black transparent transparent;
  border-bottom: none;
  left: 50%;
  top: 145px;
  margin-left: -10px;
}
再画出三角形上面的半圆共同组成扇形
.yuan {
  position: absolute;

  width: 20px;
  top: -18px;
  left: -10px;
  border-radius: 8px 8px 0 0;
  background-color: black;
}
画左右两个黑眼睛
.eye {
  position: absolute;
  border: 2px solid #000000;
  width: 64px;

  left: 50%;
  top: 100px;
  margin-left: -32px;
  border-radius: 50%;
  background-color: #2e2e2e;
}
.eye.left {
  transform: translateX(-118px);
}
.eye.right {
  transform: translateX(118px);
}
再画出黑眼睛里面的白眼睛
.eye::after {
  content: "";
  display: block;
  position: absolute;
  border: 2px solid black;
  background: #ffffff;
  width: 30px;
  height: 30px;
  border-radius: 50%;
  left: 10px;
}
画嘴唇
制作左边 lip
.mouth .up .lip.left {
  border: 3px solid black;
  width: 86px;
  height: 24px;
  border-radius: 0 0 0 50px;
  border-top-color: transparent;
  border-right-color: transparent;
  position: relative;
  transform: rotate(-15deg);
  position: absolute;
  left: 50%;
  margin-left: -50%;
}

然后用伪元素遮住鼻子下方的黑色竖线
.mouth .up .lip.left::before {
  content: "";
  display: block;
  width: 5px;
  height: 30px;
  position: absolute;
  right: -4px;
  bottom: 0px;
  background-color: #ffdb00;
}
同样原理制作右 lip
.mouth .up .lip.right {
  border: 3px solid black;
  width: 86px;
  height: 24px;
  border-radius: 0 0 50px 0;
  border-top-color: transparent;
  border-left-color: transparent;
  position: relative;
  transform: rotate(15deg);
  position: absolute;
  right: 50%;
  margin-right: -50%;
}
.mouth .up .lip.right::before {
  content: "";
  display: block;
  width: 5px;
  height: 30px;
  position: absolute;
  left: -4px;
  bottom: 0px;
  background-color: #ffdb00;
}

制作下嘴唇
.mouth .down {
  border: 1px solid red;
  height: 166px;
  width: 100%;
  position: relative;
  overflow: hidden;
}

.mouth .down .yuan1 {
  border: 1px solid black;
  position: absolute;
  width: 124px;
  height: 1000px;
  left: 50%;
  margin-left: -62px;
  bottom: 0;
  border-radius: 85px/280px;
  background: #9b000a;
}

然后在 .mouth .up .lip 中 加入和 body 一样的背景 然后画里面的部分和红脸颊
.mouth .down .yuan1 .yuan2 {
  border: 1px solid red;
  position: absolute;
  width: 150px;
  height: 300px;
  background: #fa595b;
  left: 50%;
  margin-left: -75px;
  bottom: -165px;
  border-radius: 100px;
}

.face {
  border: 3px solid black;
  position: absolute;
  width: 88px;
  height: 88px;
  left: 50%;
  margin-left: -44px;
  top: 210px;
}
.face.left {
  transform: translateX(-166px);
  border-radius: 50%;
  background: #ff0000;
}
.face.right {
  transform: translateX(166px);
  border-radius: 50%;
  background: #ff0000;
}
添加动画效果
给鼻子添加动画效果
@keyframes wave {
  0% {
    transform: rotate(0);
  }
  33% {
    transform: rotate(6deg);
  }
  66% {
    transform: rotate(-6deg);
  }
  100% {
    transform: rotate(0);
  }
}
.nose:hover {
  transform-origin: center bottom;
  animation: wave 220ms infinite linear;
}
动态展示
让一个数字自动一直加 1
新建一个
test.html和test.js在 test.html 中写一个 id 为 demo 的 p
let n = 1;
demo.innerHTML = n;
setInterval(() => {
  n += 1;
  demo.innerHTML = n;
}, 1000);
下面就可以写一段话,一个字一个字的出现
const string = "大家好,我是你们的老朋友";
let n = 1;
demo.innerHTML = string.substr(0, n);
setInterval(() => {
  n += 1;
  demo.innerHTML = string.substr(0, n);
}, 300);
但是上面代码还存在 bug ,打出 n ,会发现当字显示完了之后,n 还是一直增加,我们只需要在显示完字之后取消计时器即可,取消计时器方法如下
const string = "大家好,我是你们的老朋友";
let n = 1;
demo.innerHTML = string.substr(0, n);
let id = setInterval(() => {
  n += 1;
  if (n > string.length) {
    window.clearInterval(id);
    return;
  }
  demo.innerHTML = string.substr(0, n);
}, 300);
知道了一个字一个字显示的原理,接下来显示我们的 CSS。
test.html 中准备两个 p ,一个用来写 CSS 标签,一个用来将 CSS 内容显示在页面上。
但是,这样之后还是有一个有问题,显示的动画被文字顶下去了。 如图所示

在 test.html 中加入下面代码
<style>
  #html {
    position: absolute;
    bottom: 0;
    left: 0;
    width: 100%;
    height: 50vh;
  }
</style>
我们解决了如何让动画的问题,又出现了代码看不见的问题,接下来解决怎么让滚动条自动往下滚,并且动画固定不动
html 的内容是不需要被用户看见的,可以直接隐藏
<style>
  #demo2 {
    display: none;
  }
  #demo{
    position: fixed;
    height: 50vh;
    top: 0;
    left: 0;
    width: 100%;
    overflow-y: auto;
  }
  #html {
    position: absolute;
    bottom: 0;
    left: 0;
    width: 100%;
    height: 50vh;
  }
</style>
在 test.js 更新代码,让滚动条自动往下滚
let id = setInterval(() => {
  n += 1;
  if (n > string.length) {
    window.clearInterval(id);
    return;
  }
  demo.innerText = string.substr(0, n);
  demo2.innerHTML = string.substr(0, n);
  demo.scrollTop = demo.scrollHeight; //更新了这里
}, 0);
隐藏滚动条之后,用户依然可以滚动内容
#demo::-webkit-scrollbar {
  display: none;
}
实现慢速、中速、快速播放功能
添加播放、暂停、慢速、中速、快速按钮
刷新后,发现按钮先变大再复原,这是因为 CSS reset 影响到按钮,在 test,js 中更新代码
将样式分为两块,互不影响
.skin * {
  margin: 0;
  padding: 0;
  box-sizing: border-box;
}
.skin *::before,
*::after {
  box-sizing: border-box;
}
.skin {
  background: #ffdb00;
  min-height: 50vh;
  position: relative;
}

3.思路
暂停:清除计时器(闹钟)
播放:运行计时器
慢速:砸了闹钟,重新设一个,时间更慢
代码优化
btnSlow.onclick = () => {
  window.clearInterval(id);
  time = 300;
  id = setInterval(() => {
    run();
  }, time);
};
// 等价于
btnSlow.onclick = () => {
  window.clearInterval(id);
  time = 300;
  id = setInterval(run, time);
};
完整优化如下
暂停;
btnPause.onclick = () => {
  window.clearInterval(id);
};
播放;
btnPlay.onclick = () => {
  id = setInterval(() => {
    run();
  }, time);
};
慢速;
btnSlow.onclick = () => {
  window.clearInterval(id);
  time = 300;
  id = setInterval(() => {
    run();
  }, time);
};
中速;
btnNormal.onclick = () => {
  window.clearInterval(id);
  time = 50;
  id = setInterval(() => {
    run();
  }, time);
};
快速;
btnFast.onclick = () => {
  window.clearInterval(id);
  time = 0;
  id = setInterval(() => {
    run();
  }, time);
};
上面代码优化结果如下↓↓↓
const run = () => {
  n += 1;
  if (n > string.length) {
    window.clearInterval(id);
    return;
  }
  demo.innerText = string.substr(0, n);
  demo2.innerHTML = string.substr(0, n);
  demo.scrollTop = demo.scrollHeight;
};

const play = () => {
  return setInterval(run, time);
};

let id = play();

const pause = () => {
  window.clearInterval(id);
};

//暂停
btnPause.onclick = () => {
  pause();
};
// 播放
btnPlay.onclick = () => {
  id = play();
};
//慢速
btnSlow.onclick = () => {
  pause();
  time = 300;
  id = play();
};
//中速
btnNormal.onclick = () => {
  pause();
  time = 50;
  id = play();
};
//快速
btnFast.onclick = () => {
  pause();
  time = 0;
  id = play();
};
如果一个函数什么都没干,只是调用另外一个函数,那么外面的函数可以直接省略
例如
btnSlow.onclick = () => {
  slow();
};
//等价
btnSlow.onclick = slow;
把几个函数阻止在一起,面向一个对象
const play = () => {
  return setInterval(run, time);
};

let id = play();

const pause = () => {
  window.clearInterval(id);
};

const slow = () => {
  pause();
  time = 300;
  id = play();
};

const normal = () => {
  pause();
  time = 50;
  id = play();
};
const fast = () => {
  pause();
  time = 0;
  id = play();
};
const player = {
  run: () => {
    n += 1;
    if (n > string.length) {
      window.clearInterval(id);
      return;
    }
    demo.innerText = string.substr(0, n);
    demo2.innerHTML = string.substr(0, n);
    demo.scrollTop = demo.scrollHeight;
  },
  play: () => {
    return setInterval(player.run, time);
  },
  pause: () => {
    window.clearInterval(id);
  },

  slow: () => {
    player.pause();
    time = 300;
    id = player.play();
  },
  normal: () => {
    player.pause();
    time = 50;
    id = player.play();
  },
  fast: () => {
    player.pause();
    time = 0;
    id = player.play();
  },
};
.....
bindEvents: () => {
    document.querySelector("#btnPause").onclick = player.pause;
    document.querySelector("#btnPlay").onclick = player.play;
    document.querySelector("#btnSlow").onclick = player.slow;
    document.querySelector("#btnNormal").onclick = player.normal;
    document.querySelector("#btnFast").onclick = player.fast;
  }
  //
模块化
把一堆代码放到一个文件里导出,在导入
以上就是CSS+JS如何制作皮卡丘动画(代码分析)的详细内容,更多请关注php爱好者其它相关文章!
相关阅读更多 +
-
 飞猪客服电话是多少-飞猪机票24小时人工服务热线 2026-01-12
 -
 豆包AI网页版入口-豆包官网最新网页版 2026-01-12
 -
 妙啊是什么梗?揭秘网络爆火流行语的出处和用法,让你秒懂跟上潮流! 2026-01-12
 -
 蚂蚁庄园今日答案(每日更新)2026年1月3日 2026-01-12
 -
 高清视频画质修复神器-视频清晰度增强利器 2026-01-12
 -
 咕咪快游网页版小游戏合集-咕咪快游电脑版一键入口 2026-01-12
最近更新