asp.net mvc 2.0+Silverlight播放器开发的TeamVideo视频播放网站--系列2
时间:2010-09-04 来源:Nic Pei
这几天抽空写第二部分。很高兴今天能够和大家分享下。我这是个asp.net mvc的新手。。。希望各位提出宝贵的意见。
你可以在这里查看第一部分的内容。http://www.cnblogs.com/n-pei/archive/2010/08/30/1812981.html
按照之前计划,这一部分的内容如下:
1. 对电影的打分功能实现
2. 评论的功能实现和对输入的评论内容的验证
3. 电影列表的展示和分页功能
4. 电影详细内容显示
在说明功能实现的同时会和大家分享思路。
1。打分功能的实现(Rating):
这个功能不管怎么说都得使用AJAX方法实现,不然当某个人看电影看到鸡动处给打了5分,结果页面刷新了就杯具了。
因为打分部分好几个页面都会用到它,或者用来显示某个电影的平均分,或者提供打分功能,所以我们把它单独写出来,如下图:
创建一个HTMLHeplers类,使用StringBuilder来拼接html,最后这段html将会显示如上图中的星状打分图。代码如下:
| 1 | public static class HTMLHelpers |
| 2 | { |
| 3 | |
| 4 | public static string Ratings(this HtmlHelper helper, int Id) |
| 5 | { |
| 6 | float average = 0; |
| 7 | mediaEntities mediaDB = new mediaEntities(); |
| 8 | var video = mediaDB.Videos.Single(v => v.Id == Id); |
| 9 | |
| 10 | if (video.Ratings.Any()) |
| 11 | average = video.Ratings.Average(x => x.Rating1); |
| 12 | |
| 13 | StringBuilder sb = new StringBuilder(); |
| 14 | sb.AppendFormat("<span class='rating' rating='{0}' video='{1}' title='{2}'>", average, video.Id, "Click to rating"); |
| 15 | string formatStr = "<img src='http://images.cnblogs.com/{0}' alt='star' width='5' height='12' class='star' value='{1}' />"; |
| 16 | |
| 17 | for (double i = .5; i <= 5.0; i = i + .5) |
| 18 | { |
| 19 | if (i <= (double)average) |
| 20 | { |
| 21 | sb.AppendFormat(formatStr, (i * 2) % 2 == 1 ? "star-left-on.gif" : "star-right-on.gif", i); |
| 22 | } |
| 23 | else |
| 24 | { |
| 25 | sb.AppendFormat(formatStr, (i * 2) % 2 == 1 ? "star-left-off.gif" : "star-right-off.gif", i); |
| 26 | } |
| 27 | } |
| 28 | |
| 29 | if (video.Ratings.Any()) |
| 30 | sb.AppendFormat(" <span>Currently rated {0:f2} by {1} people</span>", average, video.Ratings.Count); |
| 31 | else |
| 32 | sb.AppendFormat(" <span>{0}</span>", "Be the first to rate this post"); |
| 33 | sb.Append("</span>"); |
| 34 | return sb.ToString(); |
| 35 | } |
| 36 | } |
Ratings方法从参数Id可以得到当前打分的是哪个Video,然后从数据库找到这个Video的Comment数量,再计算平均值,通过平均值来确定最终的分数显示哪些图片:

如何在View中使用它呢?
首先需要在需要用到的View中或者是Master模板中添加HTMLHelpers类所在的命名空间:
Import命名空间后,添加如下代码就可以显示出来这个Video
| 1 | <div class="video_rating"><%= Html.Ratings(Model.Video.Id)%></div> |
实接下来需要做的是在鼠标移动到星星上时替换图片,也就是显示出来当前的分数。
| 1 | $(".star").mouseover(function () { |
| 2 | var span = $(this).parent("span"); |
| 3 | var newRating = $(this).attr("value"); |
| 4 | setRating(span, newRating); |
| 5 | }); |
| 6 | |
| 7 | |
| 8 | $(".star").mouseout(function () { |
| 9 | var span = $(this).parent("span"); |
| 10 | var rating = span.attr("rating"); |
| 11 | setRating(span, rating); |
| 12 | }); |
| 13 | function setRating(span, rating) { |
| 14 | span.find('img').each(function () { |
| 15 | var value = parseFloat($(this).attr("value")); |
| 16 | var imgSrc = $(this).attr("src"); |
| 17 | if (value <= rating) |
| 18 | $(this).attr("src", imgSrc.replace("-off.gif", "-on.gif")); |
| 19 | else |
| 20 | $(this).attr("src", imgSrc.replace("-on.gif", "-off.gif")); |
| 21 | }); |
| 22 | } |
点击事件,当鼠标点击时,我们还需要把结果Post到服务器端,,在服务器端添加数据后再计算平均值,最终以json方式返回到客户端显示出来。
点击事件发生时执行如下操作:
| 1 | $(".star").click(function () { |
| 2 | var span = $(this).parent("span"); |
| 3 | var newRating = $(this).attr("value"); |
| 4 | var text = span.children("span"); |
| 5 | var vId = span.attr("video"); |
| 6 | $.post("/Home/SaveRating", { videoId: vId, rating: newRating }, |
| 7 | function (data) { |
| 8 | var obj = eval('(' + data + ')'); |
| 9 | if (obj.Success) { |
| 10 | text.html("Currently rated " + obj.Result.AverageScore + " by " + obj.Result.Votes + " people"); //modify the text |
| 11 | span.attr("rating", obj.Result.AverageScore); //set the rating attribute |
| 12 | setRating(span, obj.Result.AverageScore); //update the display |
| 13 | alert("Thank you, your vote was casted successfully."); |
| 14 | } |
| 15 | else { |
| 16 | alert(obj.Message); //failure, show message |
| 17 | } |
| 18 | } |
| 19 | ); |
| 20 | }); |
可以看到数据post到HomeContorller中的SaveRating方法,它的代码如下:
| 1 | [HttpPost] |
| 2 | public virtual JsonResult SaveRating(int videoId, float rating) |
| 3 | { |
| 4 | try |
| 5 | { |
| 6 | Rating videoRating = new Rating(); |
| 7 | videoRating.VideoId = videoId; |
| 8 | videoRating.Rating1 = rating; |
| 9 | videoRating.Datetime = System.DateTime.Now; |
| 10 | videoRating.User = "Nicholas"; |
| 11 | |
| 12 | mediaDB.AddToRatings(videoRating); |
| 13 | mediaDB.SaveChanges(); |
| 14 | |
| 15 | var ratings = mediaDB.Ratings.Where(x => x.VideoId == videoId); |
| 16 | |
| 17 | return Json(new JsonResponse |
| 18 | { |
| 19 | Success = true, |
| 20 | Message = "Thanks for your rating", |
| 21 | Result = new |
| 22 | { |
| 23 | AverageScore = ratings.Average(x => x.Rating1).ToString().Substring(0,4), |
| 24 | Votes = ratings.Count() |
| 25 | } |
| 26 | }); |
| 27 | } |
| 28 | catch (Exception ex) |
| 29 | { |
| 30 | return Json(new JsonResponse |
| 31 | { |
| 32 | Success = false, |
| 33 | Message = ex.Message |
| 34 | }); |
| 35 | } |
| 36 | } |
发表评论功能的AJAX实现和对用户输入数据的服务器端验证:
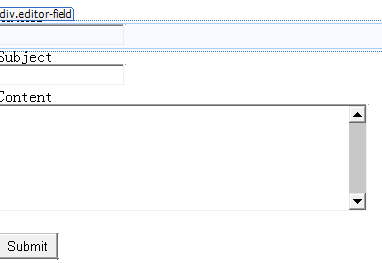
发表评论的View显示如下:

和打分功能需要注意的问题一样,不能在用户点击Submit时使用整个form的post数据,这样页面就会刷新,容易杯具。我们没法使用asp.net mvc自带的那个验证功能:

因为使用它来实现验证功能的话,必须让整个页面重新渲染,也就是必须刷新了。但是我不想使用jQuery的validation插件来实现客户端验证,它会让客户端多加载30~40K,最终我还是选择使用服务器端验证,只是通过AJAX方式传回来服务器端的验证信息。这个稍后会详细说明
先说一下我们post数据如何实现,这个和上面rating的实现方法差不多,就是回传的数据比较多而已。
| 1 | var id= $("#VideoId").val(); |
| 2 | |
| 3 | |
| 4 | $("#save").click(function (e) { |
| 5 | $(".field-validation-valid").empty(); |
| 6 | var user = $("#comment_User").val(); |
| 7 | var subject = $("#comment_Subject").val(); |
| 8 | var content = $("#comment_Content").val(); |
| 9 | $.post("/Home/SavingComment", { videoId: id, User: user, Subject: subject, Content: content }, |
| 10 | function (data) { |
| 11 | var obj = eval('(' + data + ')'); |
| 12 | if (obj.Success) { |
| 13 | // at the comment to `comments list |
| 14 | $("<div style='border: 1px solid black;' class='comment_header'> <img src='http://www.gravatar.com/avatar/0700fc1343bcd9be89d23ac8b9d8ff21.jpg?s=48' alt='test' /><span style='border-bottom:1px solid black;'>" + user + "=>Said:</span><br /><span style='border-bottom:1px solid black;'>" + subject + "</span> <br /><span>" + content + "</span><br /><span class='comment_date'>at:" + obj.Message + "</span> </div>").appendTo('#Comments-area').hide().slideDown('slow'); |
| 15 | } |
| 16 | else { |
| 17 | for (var i = 0; i < obj.Result.length; i++) { |
| 18 | $("#" + obj.Result[i].PropertyName).html(obj.Result[i].ErrorMessage).fadeIn("slow"); |
| 19 | } |
| 20 | } |
| 21 | } |
| 22 | ); |
| 23 | }); |
这里我使用了jQuery的slidedown()来让评论慢慢显示出来,有点像新浪微薄的刷微薄的样子。
当post数据到服务器端时,我们来保存好数据并以json格式返回保存成功的标志位,下面代码中的Success=true。
| 1 | mediaDB.AddToComments(new Comment() { VideoId=videoId,User=User,Subject=Subject,Content=Content,Datetime=System.DateTime.Now}); |
| 2 | mediaDB.SaveChanges(); |
| 3 | return Json(new JsonResponse |
| 4 | { |
| 5 | Success = true, |
| 6 | Message = System.DateTime.Now.ToString() |
| 7 | }); |
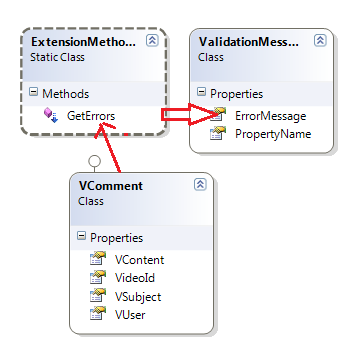
保存数据时比较简单的,但是为了完成服务器端的验证信息倒是没那么简单。我们需要创建一个VComment类,如下:
| 1 | public class VComment:IValidationModel |
| 2 | { |
| 3 | [Required(ErrorMessage = "VideoId is required")] |
| 4 | public object VideoId { get; set; } |
| 5 | |
| 6 | [Required(ErrorMessage = "User is required")] |
| 7 | public object VUser { get; set; } |
| 8 | |
| 9 | [Required(ErrorMessage = "Subject is required")] |
| 10 | [StringLength(100)] |
| 11 | public object VSubject { get; set; } |
| 12 | |
| 13 | [Required(ErrorMessage = "Content is required")] |
| 14 | [StringLength(500)] |
| 15 | public object VContent { get; set; } |
| 16 | } |
当实例化这个类后需要通过一个方法GetErrors()来得到所有的不符合验证股则的值,所有的错误信息我们会把它保存在一个ValidationMessage中,最终把错误信息以json方式传送到客户端。
GetErrors()方法:
| 1 | public static IEnumerable<ValidationMessage> GetErrors(this IValidationModel instance) |
| 2 | { |
| 3 | var metadataAttrib = instance.GetType().GetCustomAttributes(typeof(MetadataTypeAttribute), true).OfType<MetadataTypeAttribute>().FirstOrDefault(); |
| 4 | var typeObject = metadataAttrib != null ? metadataAttrib.MetadataClassType : instance.GetType(); |
| 5 | var typeProperties = TypeDescriptor.GetProperties(typeObject).Cast<PropertyDescriptor>(); |
| 6 | var classProperties = TypeDescriptor.GetProperties(instance.GetType()).Cast<PropertyDescriptor>(); |
| 7 | |
| 8 | return from property in typeProperties |
| 9 | join modelProp in classProperties on property.Name equals modelProp.Name |
| 10 | from attribute in property.Attributes.OfType<ValidationAttribute>() |
| 11 | where !attribute.IsValid(modelProp.GetValue(instance)) |
| 12 | select new ValidationMessage { PropertyName = property.Name, ErrorMessage = attribute.FormatErrorMessage(string.Empty) }; |
| 13 | } |
| 14 |
验证部分的类之间的关系:

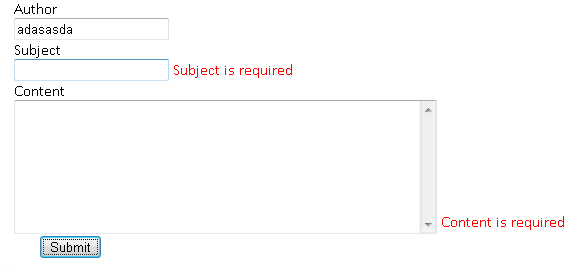
在Comment向服务器端post时,先去验证是否可以存入数据库,不可以的话就把错误信息传送给客户端:

最终给出当输入数据不符合规则时的验证页面显示:
3。电影列表的展示和分页功能
首先是电影的展示,这个功能相对来说比较容易,就是添加Movie这个Controller再添加View。先看看页面:
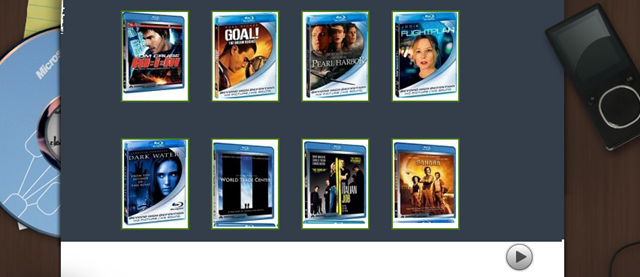
点击上面的图片后就可以进入详细介绍页面。。。。。。你会发现下面有个翻页的button,这里说明下如何实现这个功能:
| 1 | public class PageList : List<Video> |
| 2 | { |
| 3 | public int PageIndex { get; private set; } |
| 4 | |
| 5 | public int PageSize { get; private set; } |
| 6 | |
| 7 | public int TotalCount { get; private set; } |
| 8 | |
| 9 | public int TotalPages { get; private set; } |
| 10 | |
| 11 | public PageList(int pageIndex, int pageSize) |
| 12 | { |
| 13 | mediaEntities mediaDB = new mediaEntities(); |
| 14 | var videos = mediaDB.Videos; |
| 15 | PageIndex = pageIndex; |
| 16 | PageSize = pageSize; |
| 17 | TotalCount = videos.Count(); |
| 18 | TotalPages = (int)Math.Ceiling(TotalCount / (double)PageSize); |
| 19 | |
| 20 | this.AddRange(videos.OrderBy(v => v.Id).Skip(pageIndex * PageSize).Take(PageSize)); |
| 21 | |
| 22 | } |
| 23 | |
| 24 | public bool HasPreviousPage |
| 25 | { |
| 26 | get |
| 27 | { |
| 28 | return (PageIndex > 0); |
| 29 | } |
| 30 | } |
| 31 | |
| 32 | public bool HasNextPage |
| 33 | { |
| 34 | get |
| 35 | { |
| 36 | return (PageIndex + 1 < TotalPages); |
| 37 | } |
| 38 | } |
| 39 | } |
本来想用过通用的T来代替Video,发现Linq-to-entity里面如果使用Skip方法就得先排序查询结果,后面只有把T换成Video,希望有人给出好的建议。
在页面上我们需要通过如下代码来判断当前页面是否有前一页和后一页:
| 1 | <div style=" float:right;"> |
| 2 | <%if (Model.HasPreviousPage) |
| 3 | {%> |
| 4 | <a href="<%:Url.Action("Index", new {Id=(Model.PageIndex-1)}) %>"><img style=" border:none;" src="http://images.cnblogs.com/previous.jpg"/></a><%} %> |
| 5 | <% if (Model.HasNextPage) { %> |
| 6 | <a href="<%:Url.Action("Index", new {Id=(Model.PageIndex+1)}) %>"><img style=" border:none" src="http://images.cnblogs.com/next.jpg"/></a><%} %></div> |
| 7 | </div> |
4。电影详细内容显示
在详细页面我们需要显示这部电影的主演,年份,以及大家的打分,并提供一个点击后可以播放这部电影的按钮:

View的代码:
| 1 | <div id="video-detail"> |
| 2 | <div style=" border-bottom:2px solid #3e494a; colol:black; font-weight:bold; font-size:16px;"><%:Model.Title %></div> |
| 3 | <div style=" border-bottom:2px solid #3e494a"><img style=" width:600px;" src="http://images.cnblogs.com/large.jpg" /></div> |
| 4 | <div style=" border-bottom:2px solid #3e494a"><%:Model.Review %></div> |
| 5 | <div style=" border-bottom:2px solid #3e494a;">Publish at: <%:Model.Year %> Lead Actors:<%:Model.Actors %> |
| 6 | <br /> |
| 7 | <div>Wacth this film here:<a><img src="http://images.cnblogs.com/Silver-Play-Button.jpg" style=" border:none; width:20px;" /></a></div></div> |
| 8 | <div class="video_rating"><%= Html.Ratings(Model.Id)%></div> |
| 9 | </div> |
相关阅读 更多 +
排行榜 更多 +